Understanding Re-Roofing Over Ice Dam Protection
Re-roofing projects often encounter existing self-adhering ice dam protection underlayment at the eaves. Removing this underlayment can be challenging and may cause damage to the roof sheathing. Owens Corning provides detailed procedures to handle this situation effectively, ensuring the integrity of the roof.
Key Recommendations for Re-Roofing
- Initial Preparation:
- Remove all existing roof covering materials and fasteners.
- Ensure the roof deck is free from protruding nails, dust, debris, and moisture.
- Handling Existing Self-Adhered Underlayment:
- Owens Corning offers three options for dealing with existing self-adhered underlayment:
Option A: Remove Existing Underlayment
- Procedure:
- Carefully remove the existing layer of self-adhered underlayment to avoid damaging the sheathing.
- Install a new layer of Owens Corning® WeatherLock® or Titanium® PSU 30 self-adhering underlayment as required by local codes.
Option B: Replace Sheathing
- Procedure:
- If the existing underlayment cannot be removed without damaging the sheathing, replace the sheathing in all areas where the self-adhered underlayment is installed.
- Install a new layer of Owens Corning® WeatherLock® or Titanium® PSU 30 self-adhering underlayment.
Option C: Install New Underlayment Over Existing Layer
- Procedure:
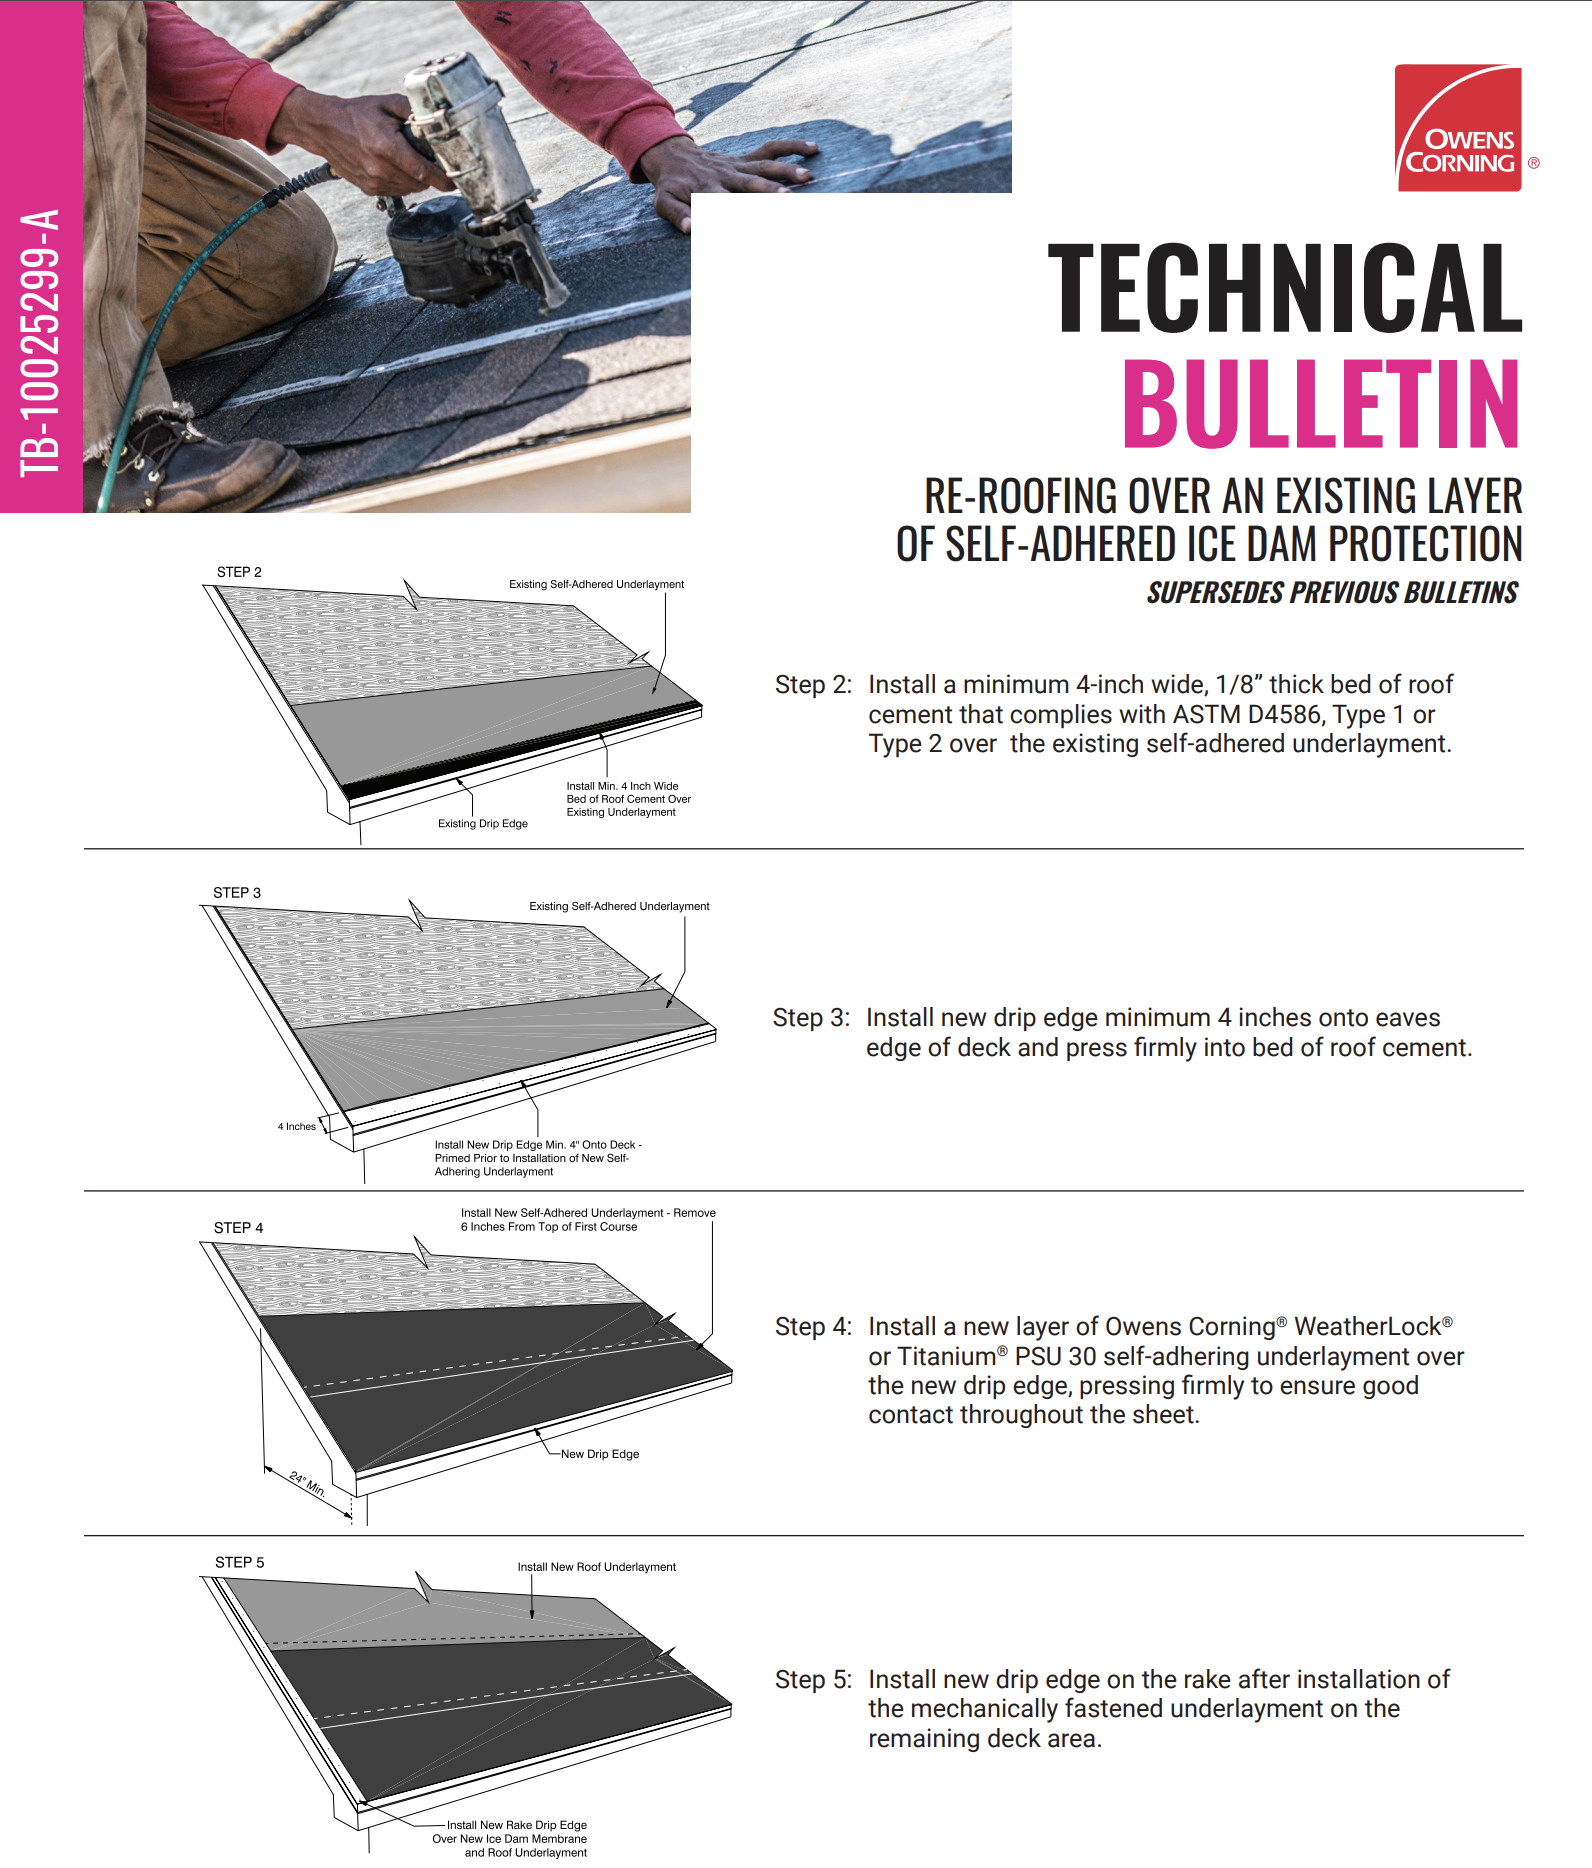
- If there is only one layer of existing underlayment that cannot be removed without damaging the sheathing, install a new layer of Owens Corning® WeatherLock® or Titanium® PSU 30 self-adhering underlayment over the existing one, following these steps:
- Prepare the Surface:
- Remove the existing drip edge from rakes.
- Ensure the existing layer of self-adhered underlayment is dry, clean, and free of protrusions.
- Apply Roof Cement:
- Install a minimum 4-inch wide, 1/8” thick bed of roof cement (ASTM D4586, Type 1 or Type 2) over the existing self-adhered underlayment.
- Install New Drip Edge:
- Install a new drip edge, extending a minimum of 4 inches onto the eaves edge of the deck, and press it firmly into the bed of roof cement.
- Install New Underlayment:
- Place a new layer of Owens Corning® WeatherLock® or Titanium® PSU 30 self-adhering underlayment over the new drip edge. Press firmly to ensure good contact throughout the sheet.
- Install Drip Edge on the Rake:
- After installing the mechanically fastened underlayment on the remaining deck area, install a new drip edge on the rake.
Important Considerations
- Warranty Limitations:
- Note that Option C does not apply to Platinum Protection or Preferred Protection Limited Warranties, which require installation over a clean roof deck with all existing roofing material and debris removed, including ice and water membrane.
- Material Compatibility:
- Ensure compatibility of roofing materials to avoid issues such as asphalt softening, flowing, and dripping, which can cause staining to the fascia, gutters, and building exterior. Owens Corning is not responsible for damage caused by incompatible roofing components not manufactured by them.
Conclusion
Re-roofing over an existing layer of self-adhered ice dam protection requires careful preparation and adherence to specific procedures to maintain the roof’s integrity and performance. By following Owens Corning’s recommendations, homeowners and contractors can ensure a successful re-roofing project.
For Immediate Service or Consultation
Contact Allied Emergency Services, INC.
Phone: 1-800-792-0212
Email: Info@AlliedEmergencyServices.com
Location: Serving Illinois, Wisconsin, and Indiana with a focus on the greater Chicago area.
If you require immediate assistance or have specific questions, our human support is readily available to help you.
Disclaimer: This article is intended for informational purposes only. For professional advice, consult experts in the field.
