⚡ Storm or Roof Damage? Get a FREE Estimate
Text ESTIMATE to (844) 907-2546
Or call (800) 792-0212 for 24/7 emergency response
AI-powered • No obligation • Licensed IL & WI
What Is the Concern?
Cone roofs, which consist of a circular base with sides tapering up evenly to a point, present unique challenges for shingle installation. There are two main types of cone roofs: those with flat sides (appearing like pyramids) and those with round sides.
How Can It Affect My Roof?
For flat-sided cones:
- Preparation: Start by installing GAF ShingleMate®, Roof Pro™, TigerPaw™, or Deck Armor™ roof deck protection (underlayment) from the peak to the base, vertically. Trim any excess overlap before installing shingles.
- Chalk Lines: Snap a vertical chalk line from the tip of the cone to the center of the eave on each flat side. Apply shingles to the flat areas and cut at the hips.
- Horizontal Chalk Lines: Snap continuous horizontal chalk lines around the cone to ensure shingles line up on all sides.
- Hand Sealing: On slopes greater than 21:12, hand seal the shingles.
- Hip Joints: Use standard hip and ridge shingles to complete the hip joints.
What Should You Do?
For round-sided cones:
- Preparation: Start by installing GAF ShingleMate®, Roof Pro™, TigerPaw™, or Deck Armor™ roof deck protection from the peak to the base, vertically. Trim any excess overlap before installing shingles.
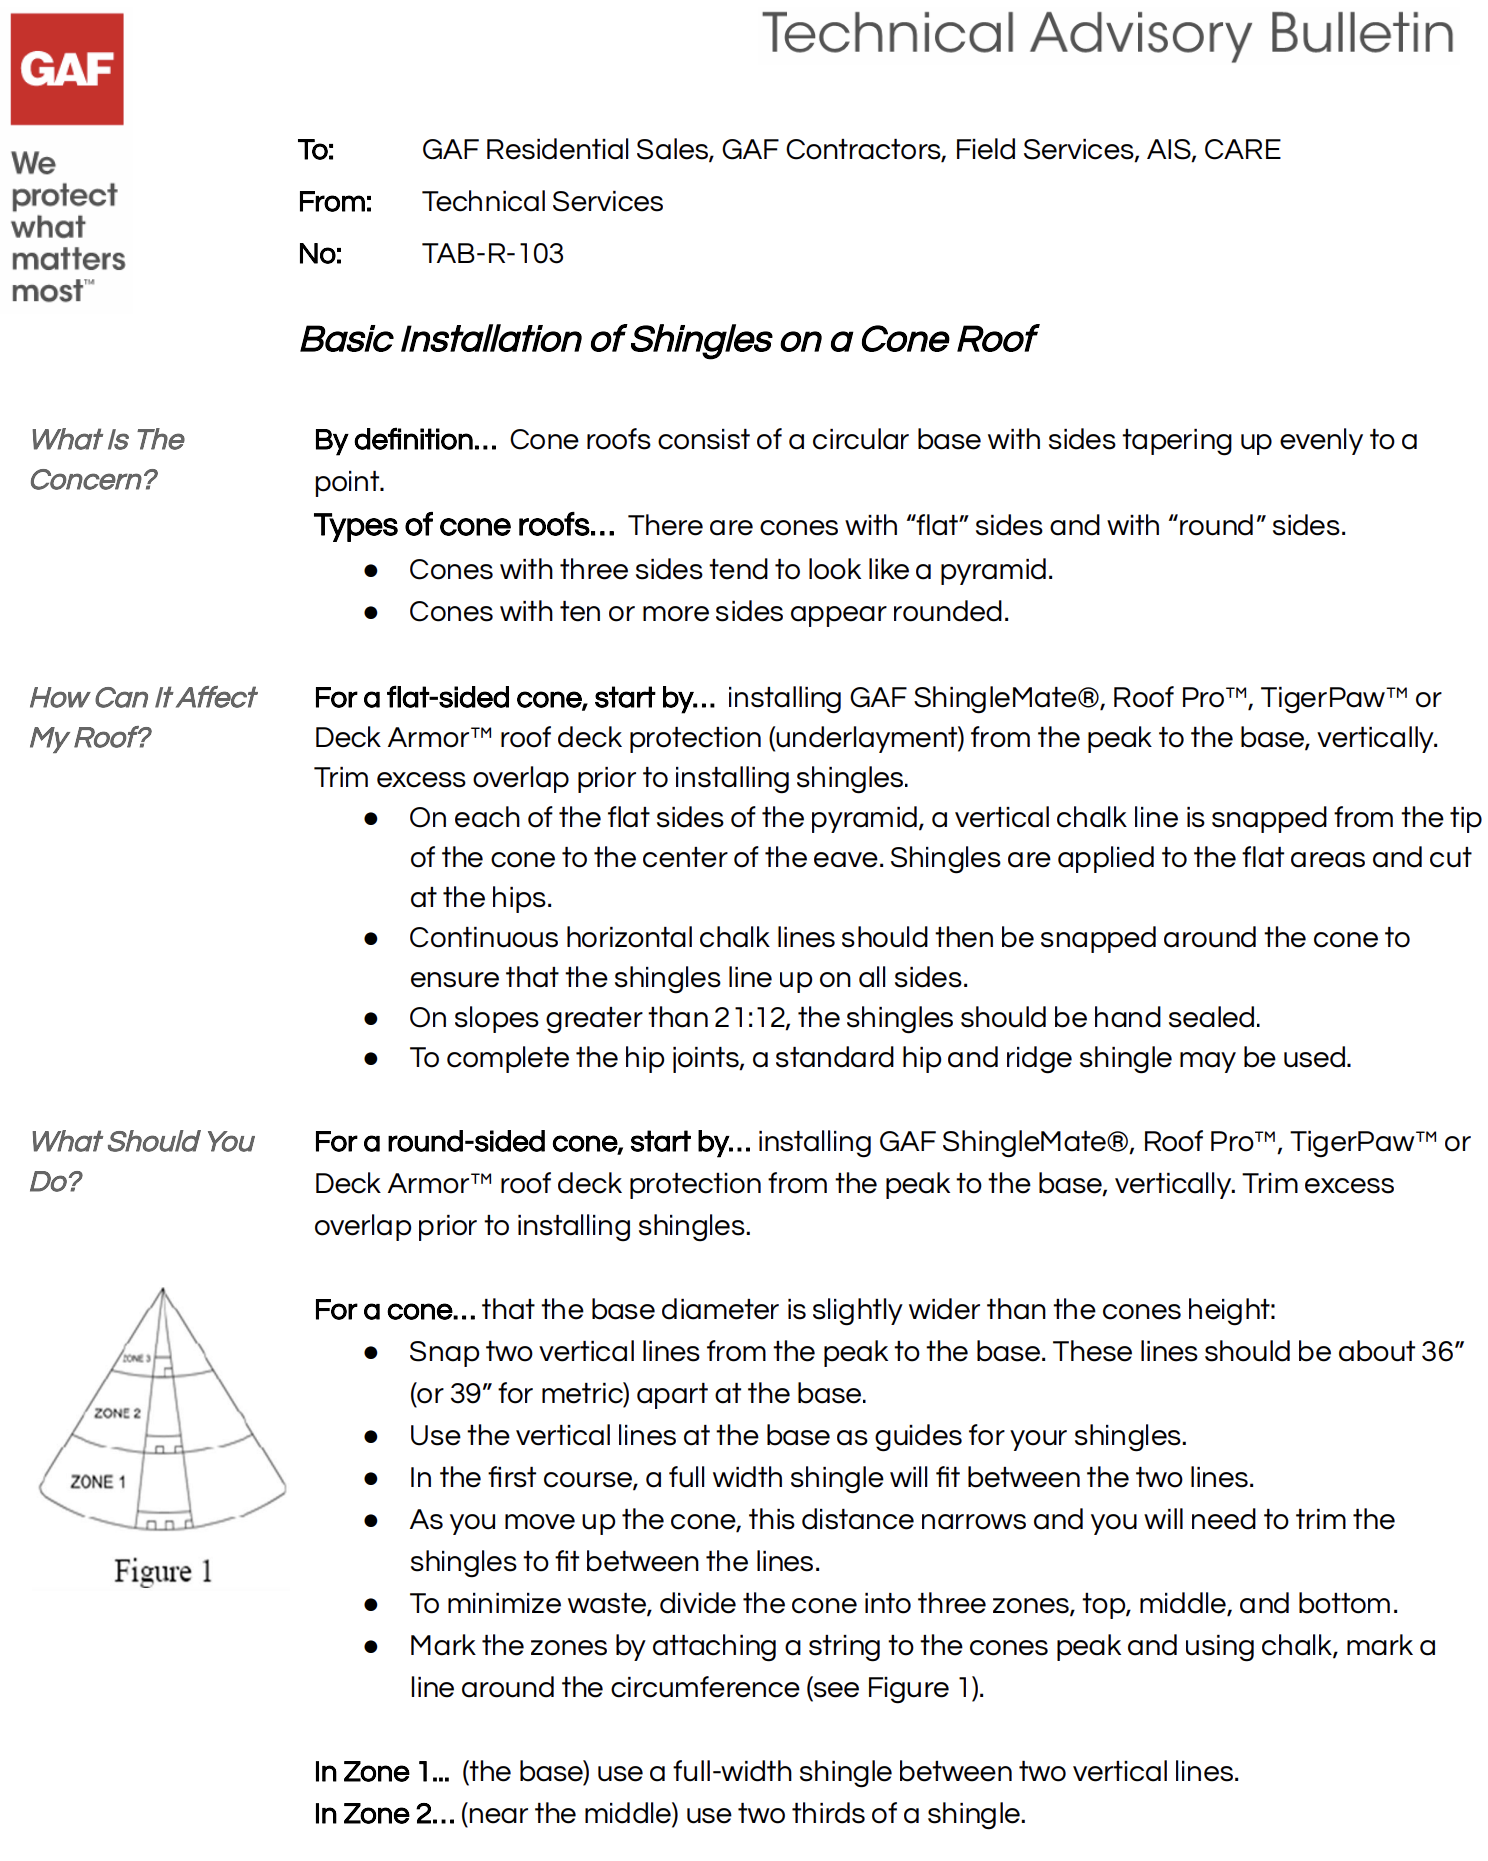
For cones where the base diameter is slightly wider than the cone’s height:
- Vertical Lines: Snap two vertical lines from the peak to the base, about 36” (or 39” for metric) apart at the base. Use these lines as guides for shingle placement.
- Shingle Courses: In the first course, fit a full-width shingle between the two lines. As you move up, the distance narrows, requiring you to trim the shingles to fit.
- Minimize Waste: Divide the cone into three zones: top, middle, and bottom. Mark these zones with chalk lines.
Zone Instructions
Zone 1 (Base):
- Use a full-width shingle between the two vertical lines.
Zone 2 (Middle):
- Use two-thirds of a shingle.
Zone 3 (Peak):
- Use one-third of a shingle.
Marking the Zones
- Zone 1 and 2 Division: Cut a two-thirds width shingle to fit exactly between the two vertical lines and scribe a line around the cone.
- Zone 2 and 3 Division: Cut a one-third width shingle to fit exactly between the two vertical lines and scribe a line around the cone.
Shingle Overlap and Trimming
- Base Overlap: At the base, there will be little shingle overlap. As you move up, side overlap increases.
- Trimming: Trim the shingles at an angle parallel to the flow of water, determined by pulling a string line from the top of the cone to the base and trimming along that line.
- End Joints: Offset shingle end joints by 3” or more to prevent water infiltration.
Conclusion
Proper installation of shingles on a cone roof requires careful planning and precise execution. By following these guidelines, you can ensure a durable and aesthetically pleasing roofing system.
For Immediate Service or Consultation
Contact Allied Emergency Services, INC.
Phone: 1-800-792-0212
Email: Info@AlliedEmergencyServices.com
Location: Serving Illinois, Wisconsin, and Indiana with a focus on the greater Chicago area.
If you require immediate assistance or have specific questions, our human support is readily available to help you.
Disclaimer: This article is intended for informational purposes only. For professional advice, consult experts in the field.
⚡ Need Storm Damage Help? We Serve 155+ Cities
Allied Emergency Services provides 24/7 emergency restoration across Illinois, Wisconsin, Indiana, and Michigan. Text ESTIMATE to (844) 907-2546 for a free estimate in minutes.
Top service areas: Chicago • Naperville • Aurora • Kankakee • Joliet • Rockford • Schaumburg • Milwaukee • Madison • We’re Hiring!
⚡ Storm or Roof Damage? Get a FREE Estimate
Text ESTIMATE to (844) 907-2546
Or call (800) 792-0212 for 24/7 emergency response
AI-powered • No obligation • Licensed IL & WI